Just a blog to share my tricks, code snippets

Friday, March 10, 2017

Some useful adb commands with Android emulators using in mobile automation


Please be notice that below commands are for windows.

  • Manually install the app to the emulator:

adb install path_to_apk
For example:
adb install D:\abc\newapp\VSee-vsee-release.apk
If you have more than 1 emulators, use option 's' to specify the device
>adb devices
List of devices attached
emulator-5554 device
emulator-5555 device

>adb -s emulator-5555 install helloWorld.apk
Note: If you issue a command without specifying a target device when multiple devices are available, adb generates an error.

  • Take a screenshot:

adb shell screencap path_to_save_screenshot
For example:
adb shell screencap /sdcard/screen.png

  • Copy files to/from a device:

To copy a file or directory and its sub-directories from the device
adb pull remote local
For example:
adb pull /sdcard/screen.png .
To copy a file or directory and its sub-directories to the device, do the following:
adb push local remote
For example:
adb push foo.txt /sdcard/foo.txt

For all the adb command, you should check out the Android developer page at HERE

Wednesday, March 8, 2017

Python: get Hipchat 1-1 history chat


Group chat history is only exported by users with admin permission only. However, a normal user can export his 1-1 history chat via Hipchat API.
Below is a simple script to export 1-1 history chat.

How to generate your hipchat access token: An access token is used in place of user and password parameters.
  • Login to your hipchat account on a web browser
  • Go to Account Setting by clicking on your person icon in the upper, right corner.
  • Select API Access.
  • Generate a token with suitable scope (Select "View Messages" in this case since we want to get the history chat)


How to the user ID: User ID is the the ID of the user that you want to get the history chat.

  • Click to open chat with the user
  • The user ID is from the URL


For more information about the API, you can access this Hipchat API page

Tuesday, March 7, 2017

Improve Android Genymotion Emulator performance for mobile automation testing


1. Change the resolution: Open Genymotion --> Select Configurate this virtual device --> Reduce the ScreenSize - Density.


2. Disable Animations:
  • Enable developer mode by going to Settings > About phone, then tap on Build number several times to enable it


  • Go to Settings > Developer options, and scroll down to Window animation scale, Transition animation scale, and Animator duration scale. Turm off all of them


  • Some people reported that turning off animation may cause stranger behavior in some apps. Follow this article for more information HERE


Note: if you are not using the Genymotion emulator but the emulator from Android SDK, you can follow this topic to make it run faster HERE

Saturday, March 4, 2017

Friday, March 3, 2017

How to copy an ESXi VM from a different host without vCenter


With vCenter, cloning and moving a VM from a host to a different host is really easy. It just takes a few clicks and then everything is done. Copying a VM from a host to different host without vCenter, however, is a bit more challenging. Belows are steps to copy a VM to different host without vCenter.

1. Locate where your source VM is on the host:
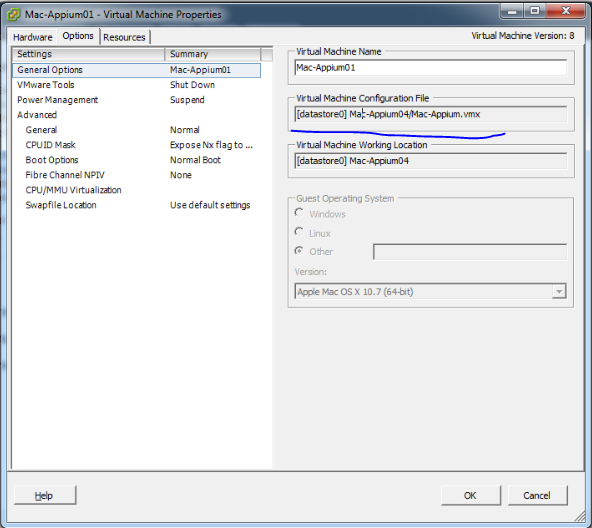
- Login VMware vSphere Client on your host --> right click to the VM you want to locate --> Edit Setting --> Select Options tab
- Note down the path of Virtual Machine Configuration File. In this case, it is [datastore0] Mac-Appium04/Mac-Appium.vmx.
- SSH to the host, the VM location is /vmfs/volumes/datastore0/Mac-Appium04  (datastore0/Mac-Appium04 is what we refer from the path of Virtual Machine Configuration File and /vmfs/volumes/ is where ESXi puts VMs by default)


2. Copy the VM folder to the different host with scp command:

scp -r robin@10.10.2.20:/vmfs/volumes/datastore0/Mac-Appium04 /vmfs/volumes/datastore/

Note: robin is the username to ssh to the host. /vmfs/volumes/datastore/ is where I want to put VM on the destination host.

3. Add the VM on VMware vSphere Client
- Login the destination host using vSphere Client
- Open datastore browser
- Find the VM, right click on the .vmx file and select 'Add to Inventory'
- Once you finish above steps, the VM is shown in vSphere client

Wednesday, March 1, 2017

How to update Appium server


Appium 1.6.0 has released a while. Below are steps to update Appium from old version to newest version (1.6.0). Note that Appium 1.6.0 is the Appium server version. It is different with the Appium GUI version which highest version is stilll 1.5.3:
- Update Xcode to newest (8.1): go to Appstore --> search for xcode --> update --> open Xcode to accept license
- Update Appium server:
npm update -g appium
- add desired_caps['automationName'] = 'XCUITest'
- Fix some issues:
+ https://github.com/appium/appium/issues/6978
* use this command: npm install -g appium --no-shrinkwrap
+ install carthage: brew install carthage
+ https://github.com/appium/appium/issues/7242
+ some xpath does not work --> use accessibilityid or XCUI
+ sudo /usr/sbin/DevToolsSecurity --enable